
How to Make a Solar Panel from a CD? | DIY Guide
We all know that the world is facing a tremendous energy crisis, and we must find a way to reduce our carbon footprint. But with the cost of solar panels on the rise and not everyone willing to put them on their roof, there has to be another solution for those who want to go green but don’t want to spend a lot of money.
An idea for making solar panels at home out of CDs panel is the best way to harness the power of sunlight and convert it into electricity. It can be an economical option if you’re not set on installing solar screens or window tinting on your windows or panels on your roof. Be it incompatible roof material reasons of costly installation, this one is sure as cheap as DIY gets!
How To Make A CD Solar Panel
A list of tools that will be required to make a solar panel with a CD
- super glue,
- cardboard,
- measuring tape,
- A couple of CDs (depending on the size of your window),
- A utility knife
- a pencil,
- a drop cloth made of clear plastic,
- A few S hooks,
- scissors,
- an awl,
- black spray paint.
- masking tape.
It sounds fun, right? Solar panels can be made with the help of a CD. But relatively, it makes good use of CDs, which are now trash for some of us in this era. Constructing a CD solar panel can be a fascinating scientific experiment for kids or a fun DIY project for adults.
The following are the steps:
1. CDs Must be Measured and Cut
The first step is to measure the length and width of the window on which the panel is to be attached. For instance, add 4/8 inches to the actual measurement of cardboard.
Now, with the help of a utility knife, cut the cardboard. Cut four pieces of rectangular cardboard from the unused cardboard sheet. They should be 3/4 of the width of the window.
2. CDs should be Painted
Now spray the entire one-sided cardboard with black spray paint. This is because dark colours, especially black, absorb heat from the environment. For best results, add one more coat. Before using any other colors, you must wait at least half a day for the paint to dry completely.
3. Create A Box
The next step is to cut a four-inch square from each of the cardboard piece’s corners, then bend the edges of the cardboard in such a way that the corners meet, resulting in a box with the black painted side inside. Masking tape must now be used to tape up the corners.
4. Insert the CDs into the Container
The CDs are now ready to be arranged in rows within the box, bright metal side out. Be assured that it is humanly possible to make the rows as even as possible.
You’ll have some margin for error, but that won’t be an issue. Just make sure the bottom row of CDs touches the cardboard box’s bottom side, and the top row should touch the cardboard box’s top.
5. Glue the Rectangles
Next, trace the center holes of the CD rows (both top and bottom) using a pen, then remove them and cut the holes out with your utility knife. After that, use super glue to adhere the CDs to the holes.
The rest of the CDs will be glued down after that, but remember to allow a small gap below and above the top and bottom rows. Make sure there’s enough room below and above the central row.
It’s time to cut four four-inch-wide rectangles from the leftover cardboard, each measuring three-quarters of the width of your box. Glue the rectangles to the edge of the box like maze walls. The first rectangle will be placed above the bottom CD row and against the left side of the cardboard box.
The second will be placed below the center row and against the right side. The third will be placed above the center row and against the left side, and the fourth will be placed below the top row and against the right side. Allow the adhesive to dry for a few hours once you’ve finished.
6. Make the Container Airtight
Make the container airtight to avoid any kind of moisture or humidity that could affect your solar panel.
7. Make the Hooking Arrangement
With a utility knife, cut a cloth piece of overall length to shape it into something 3 inches longer and wider than the container. Unfold the cloth over the top, gluing the sides of the container. Make holes in the two upper corners of the container to insert the S-hooks. Finally, you can hang the solar panel on the window.
How To Make A Compact Solar Panel Using Diodes
The world has a growing demand for renewable energy to help power our cities and towns. Solar panels are becoming more common as an alternative to traditional sources of electricity, but they can be costly to produce.
We’ll discuss how you can make solar panels with the help of diodes, which will not only save you money but also teach you about these handy little devices that have many uses in electronics.
Materials needed
- CD (duh!)
- Copper wire
- Zener diodes
- Electrical wire that is insulated
- Multimeter
- Superglue
- Soldering iron
- Wire cutters
- Small low-voltage devices
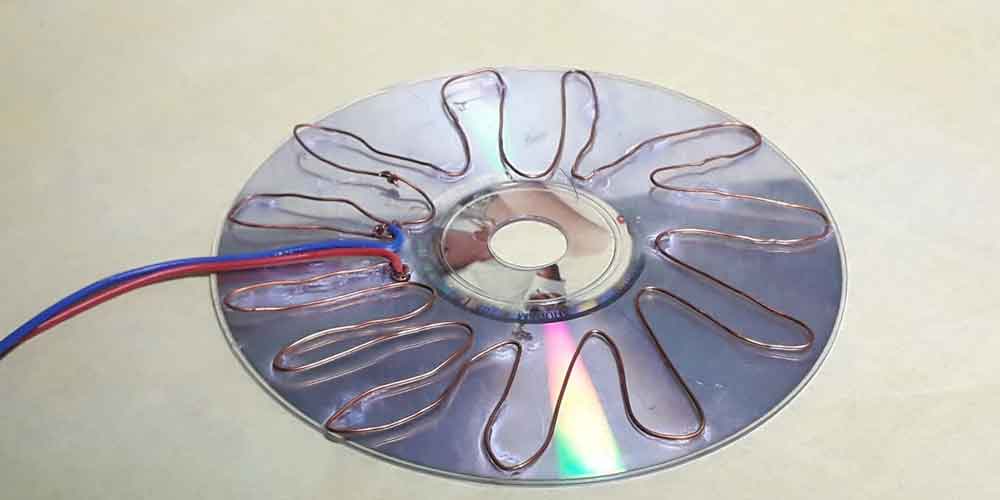
1. Attaching The Copper Wires
Gluing the copper wire to the CD’s shiny backside, rendering the disc unplayable. This can be accomplished in a variety of ways, but one frequent option is to bend the copper wire into different curving parts. You can begin by glueing the copper wire’s very end near the CD’s centre hole.
The copper wire should next be extended up to the disc’s edge, formed into a hairpin bend, and then brought back to the central holes. Continue this process as you proceed around the CD in a circle, attaching the wire as needed. You’ll want to cut the wire around the center hole after every 3 or 4 bends and start a new portion.
2. Attach The Zener Diodes
After the copper wire has been bonded and left to dry, the Zener diodes must be attached. The voltage is regulated with the help of Zener diodes. These diodes should be inserted into the spaces between the copper wire cuts. Connect the ends of the copper wire to the Zener diodes’ ends with a soldering iron. Make sure to leave one of the spaces free, as this is where the insulated wires will be connected in the next step.
3. Connect The Insulated Electrical Wire
It’s time to connect the insulated electrical line to your DIY CD solar panel after the Zener diodes have been soldered to the copper wire. To make a better connection, tidy up the very ends of the wires using a knife or small blade.
The soldering iron will be used once more to fuse the two remaining copper wire ends to the insulated electrical wire ends. You’re almost done with your simple CD solar panel after this stage.
4. Finally, Test the Solar Panel
Pick a sunny day and take your diode solar panel outside. A voltmeter or a small low-voltage device would be useful here.
Advantages of Using CDs as Solar Panels
- Learning how to build a solar panel from a CD is surely educational. This DIY project allows for hands-on learning and allows you to see the results of your efforts. It can be a platform for many people who want to pursue more complex solar projects and learn more about renewable energy.
- Using CDs and copper wires to capture solar energy is a low-cost technique to generate real electricity. All of the energy generated by your CD solar panel will come from free, easily workable sunlight.
- Yes, this homemade CD solar panel can be used as a fun toy. It is totally up to you to decide what you want to power with your solar panel. Many people use it to power small handheld fans or even miniature lights, despite the fact that its overall power output is limited.
- It can be used as a science experiment in school.
How Does the Process Work?
The photovoltaic process (converting the sun’s rays into usable energy) provides electrical power for a typical solar photovoltaic panel.
The solar panels do not need to be connected to a battery or an inverter.
The procedure is less complex than in a grid-connected system. The technique is no less valuable than that used in photovoltaic power generation.
Follow the steps mentioned above to construct a solar panel CD in an easy way.
Conclusion
Solar energy is renewable and clean. It does not produce harmful byproducts such as carbon dioxide that cause climate change. However, it’s a problem for many homeowners to invest in solar panels when they are very expensive. Fortunately, there are some ways to make your own solar panel using old CDs!

Thanks for the work, but at least post for us a video for that explanation
Can the energy be stored in the CD solar panel for later use?
What zener diodes should we use for this?
nice try, but save your cds and perform pyrolysis if you want some practical energy, use the remaining carbon as an electrical conduct in your next wonderful experiment.