DIY Solar Panel Patio Cover | Step-By-Step Guide
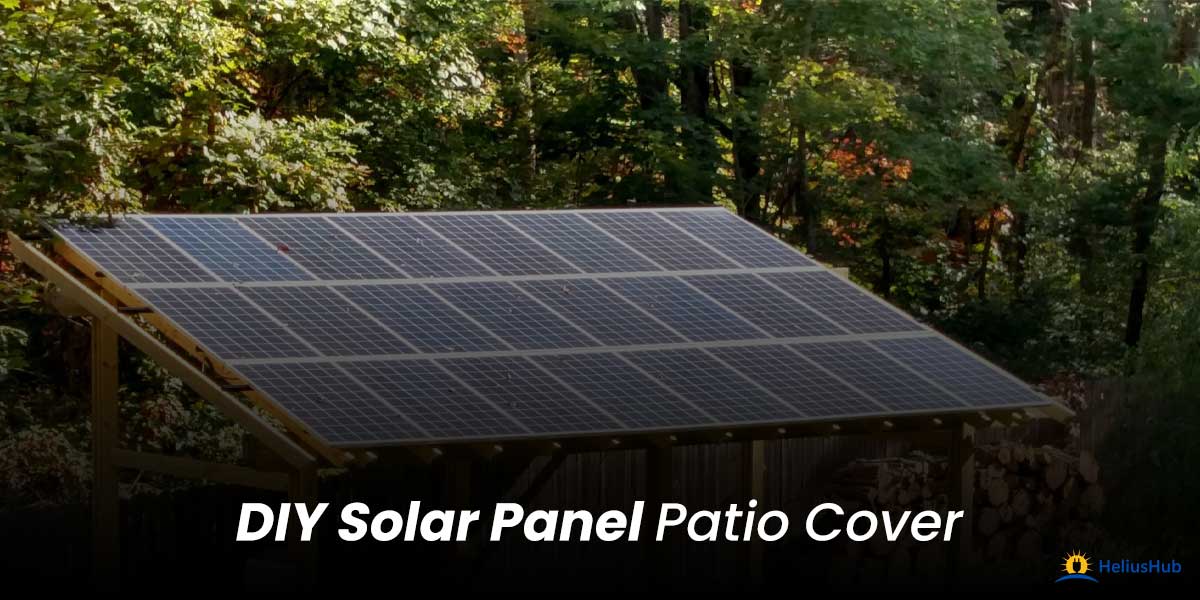
The ideal, multifunctional addition to any property is a pergola. It provides atmosphere, shade like solar screen and tinting window, and a place to have fun. How about transforming it into something more, like a solar pergola?
It’s possible to have a pergola with solar panels attached, believe it or not. You’ll be left with a striking building that can pay for your monthly electricity bill.
But what would a do-it-yourself solar pergola cost? How exactly do you go about making your own one, and what can it power?
This article will cover everything from the size and wattage needed for solar panel installation and the process of installing the solar pergola.
- 1. What Is A Solar Panel Patio Cover?
- 2. What Is A Solar Panel Pergola?
- 3. Can You Put Solar Panels On The Solar Pergola?
- 4. How Much Weight Can A Solar Pergola Support?
- 5. Size And Wattage Of Solar Panels For Solar Pergola
- 6. What Does The Solar Panel Pergola/Patio Kit Contain?
- 7. How Much Power A Solar Pergola/Patio Can Generate?
- 8. DIY Solar Panel Pergola/Patio Installation
- 9. Conclusion
-
10.
FAQs-
- 10.1. 1. How long will a solar panel patio system last?
- 10.2. 2. Can I use a solar patio system to power my entire home?
- 10.3. 3. Can a solar patio system be installed on an existing patio?
- 10.4. 4. Is a solar patio system a good investment?
- 10.5. 5. What happens when the sun is not shining? How it will affect solar patio system?
- 10.6. 6. How long does it take to install a solar patio system?
- 10.7. 7. Are there any maintenance requirements for a solar panel patio system?
What Is A Solar Panel Patio Cover?
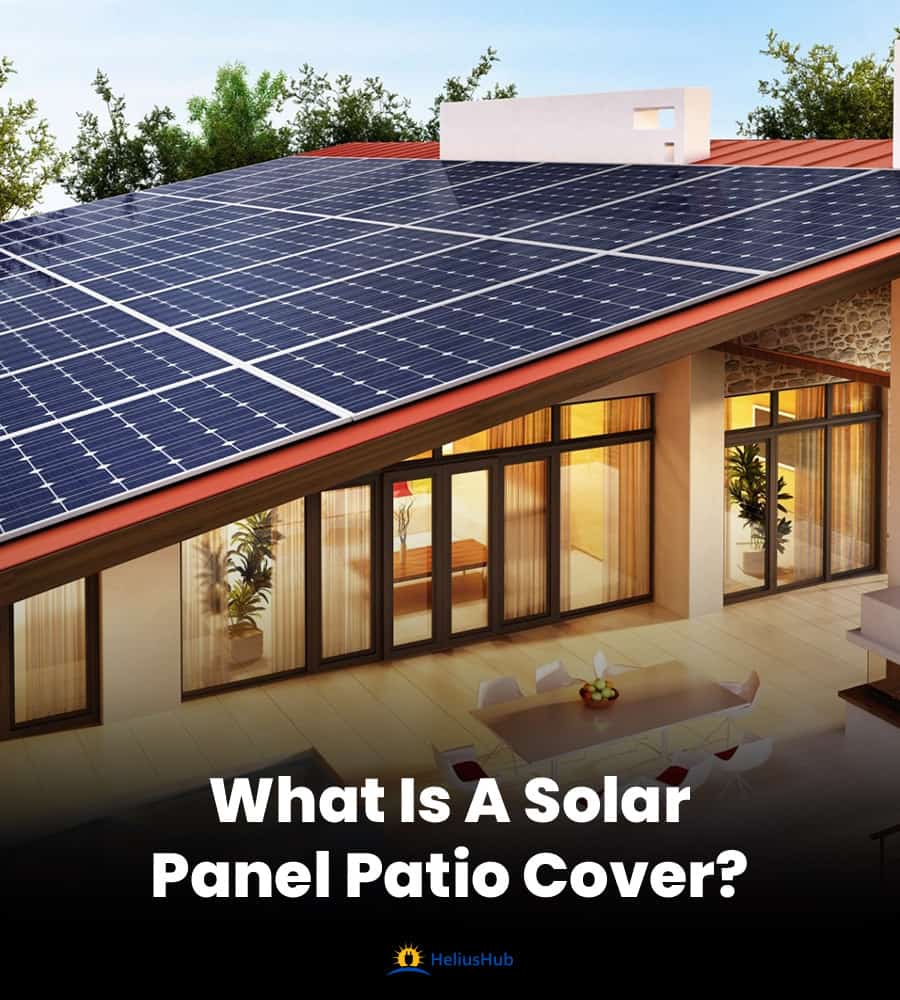
A patio is a place where you can unwind and appreciate your outside space’s elegance at its finest. A patio is typically designed as a useful addition where you and your family can dine and enjoy leisure activities. While a patio doesn’t need a roof, you should consider adding one.
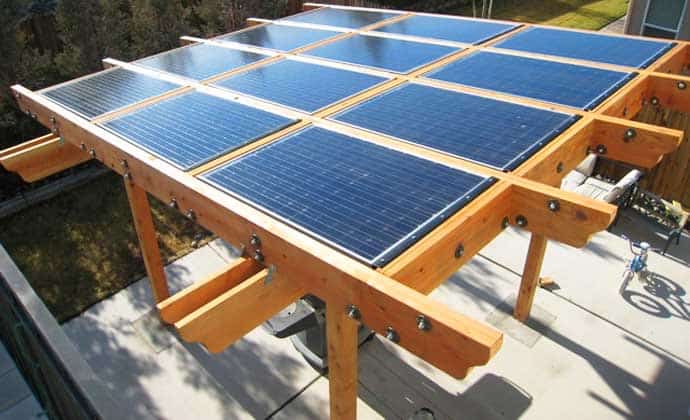
A solar patio cover serves as both a roof for your patio and a framework for installing solar panels. It is just that, instead of a regular fiber or steel roof, you would use a robust solar-paneled roof.
Modern patios and pergolas serve overlapping purposes; therefore, the terms solar patio covers and solar pergolas are frequently used interchangeably.
Let’s say you want to cover an existing pergola or patio with solar panels. What materials would you need for that, and how do you construct one? We will see that in the next section.
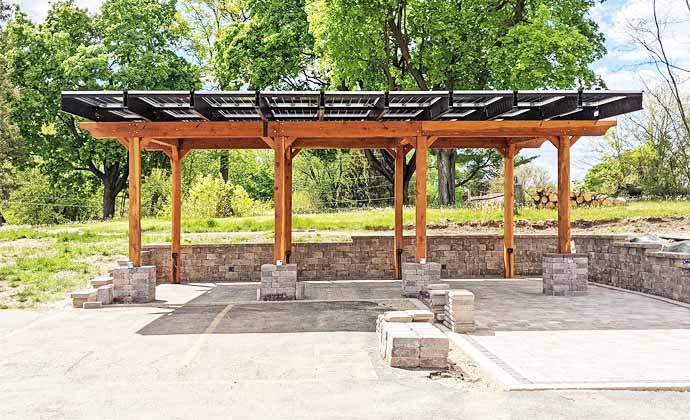
What Is A Solar Panel Pergola?
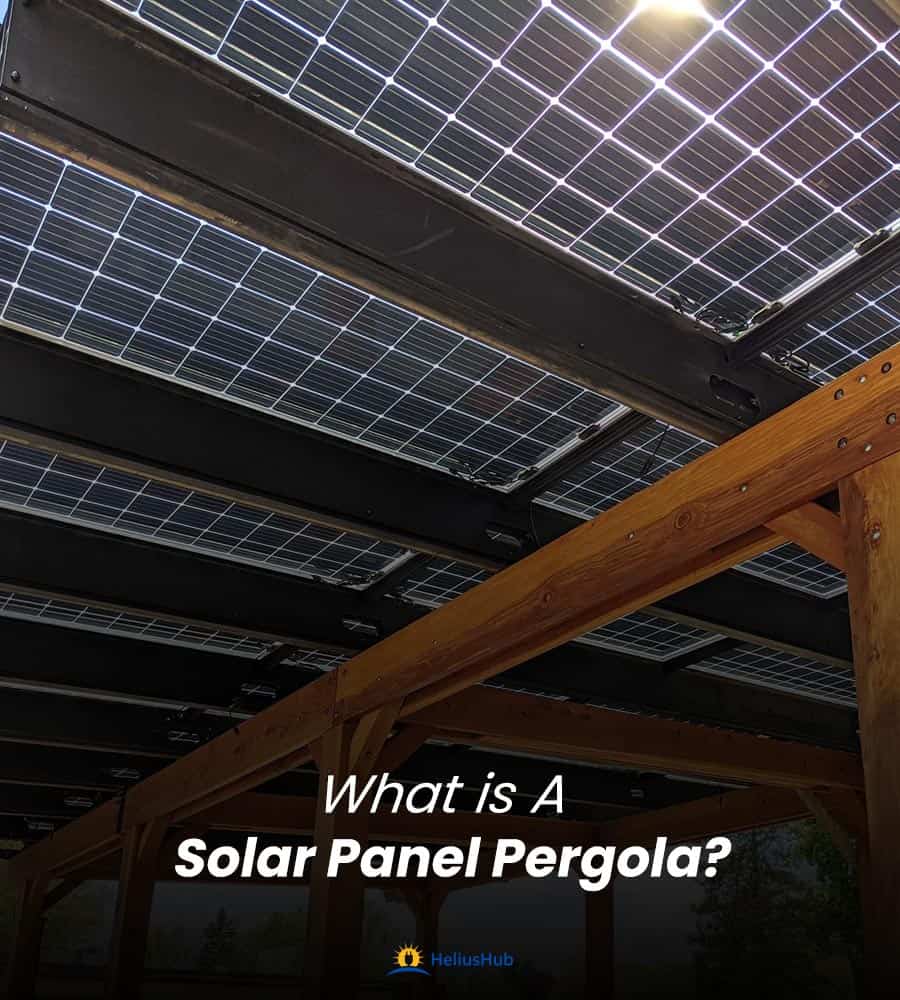
A pergola is an outdoor structure that offers paths, seating areas, and garden-shaded sections. The living area is expanded outdoors by a pergola.
Experts in home design agree that a pergola is the best option to provide shade for your garden or property. Slats make up the roof construction of traditional pergolas.
A solar pergola adds a built-in solar system. These have an angled mount on the pergola’s top to catch as much sunlight as possible.
A solar pergola is a roof that is built over a typical pergola. It provides shading, weatherproofing, and electricity generation. Traditional pergola roofs can be replaced with solar pergolas, which are more advantageous.
Can You Put Solar Panels On The Solar Pergola?
Simply put, it is possible to include solar panels on an existing pergola. You can add solar panels to the pergola if it already exists in your backyard.
Weight of a Solar Panel
Let’s think about a typical 100-watt solar panel:
A 100-watt solar panel typically has dimensions of 40 x 20 x 3 inches. The dimensions of shorter ones are around 32.5 x 26.4 x 1.18 inches. You can anticipate that a 100w solar panel will weigh between 14 and 20 pounds.
How Much Weight Can A Solar Pergola Support?
A typical pergola can support up to 300 lbs of weight. You’ll have a fair notion of how many solar panels a pergola can carry once you take into account the size of the structure as well as the size and weight of your preferred solar panels.
Size And Wattage Of Solar Panels For Solar Pergola
Here are some standard pergola sizes:
- 12′ x 16′ Small to Medium Sized Decks
- 16 x 24-foot large decks
- Freestanding Pergola in the Backyard, 12 x 16 or 16 x 20
- 12 ft. x 12 ft. small patio
The truth is that there is no set size requirement for your solar pergola. Once more, the size is up to you.
- Before establishing a solar pergola, you should think about the following questions.
- The size of my yard is.
- What is my spending limit?
- Are you looking to get off the grid or just power a few things in your home?
A 100-watt panel typically measures 1005mm by 670mm (39.5′′ × 26.5′′), giving it a surface area of 0.673 square meters, or 7.25 sq ft.
The average area of a medium-sized pergola will be around 15 m2 (161 ft2), so you can easily fit one solar panel of 100W capacity. Depending on your total target or the number of solar panels, you can fit more.
What Does The Solar Panel Pergola/Patio Kit Contain?

Most solar pergola/patio kits include everything you need to create your solar pergola. Still, they do not come with solar panels, racks, or other solar-related hardware.
It will usually include things like:
- Posts
- Double beams
- Rafters
- Angle braces
- Top slats
- Bearing boards to support a solar rack system
- Ledger board + concrete anchors or lag screws
- Stainless steel hardware
You need to note that this is not a standard, and there might be vendors that will not contain all of the things mentioned here.
How Much Power A Solar Pergola/Patio Can Generate?
The typical pergola roof size for a garden or house is 12 feet by 12 feet or 144 square feet. On 144 square feet, how many 100-watt solar panels will fit?
Let’s utilize a 100-watt panel’s measurements, which are 39.5 inches long by 26.5 inches wide. We can comfortably place three panels lengthwise (12 feet is 144 inches).
The result of dividing 144 by 26.5 inches is 5.4, or 5 panels.
We can fit a total of 3 x 5 = 15 100-watt solar panels on a 12-foot by 12-foot pergola roof.
DIY Solar Panel Pergola/Patio Installation
Tools needed to build solar pergola/patio ( list tools in table format)
| Tool/Material | Product Source/Recommendation |
| Concrete | Source locally |
| Concrete forming stakes | Source locally |
| Spade + Wheelbarrow/Concrete Mixer | Fiskars 46 Inch Steel D-handle Square Garden SpadeGarden star wheelbarrowAlternatively, you can rent or buy a concrete mixer |
| Sonotubes/ two by fours | Source locally |
| Jackhammer/Dingo | XtremepowerUS Electric Jack hammerTR Industrial Electric Jack HammerAlternatively, you can rent a jackhammer or dingo |
| Laser Levels | Black & Decker Laser LevelBOSCH Cross-Line Laser Level |
| Screws | Timberlock ScrewsSimpson Strong Tie Structural Wood Screws And Nut Washers |
| Drill | Black & Decker 20V MAX Cordless Drill |
| Wood | Source locally |
| Wood Sander | DEWALT Palm Sander |
| Wood Stainer | #1 Deck Premium Semi-Transparent Wood Stain for Decks, Fences, & Siding |
| Brushes | Pro Grade – Paint Brushes |
| Roof Risers | Purchase from manufacturer |
| Flashing | Provided by riser manufacturer |
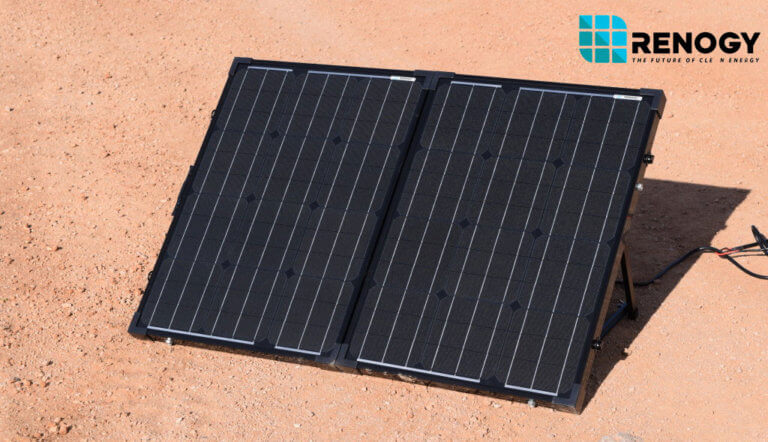
| Solar Panels | Renogy panels are a good option |
1. Base Construction
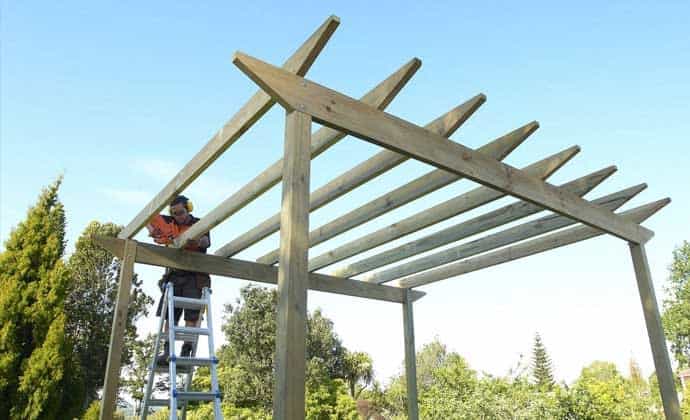
Before starting to build a pergola, take the following into account:
- What location do you have in mind for your pergola?
- What size will they be?
- How many panels will you need to install in order to generate the necessary electrical output?
- SketchUp, an excellent 3d modeling program, can help you with the pergola design.
Regardless of how you design, once it’s done, you’ll need to get it authorized before moving forward. A permit certifies the construction project as secure and safe, like any residential construction project.
This can be a bit complicated because there are state, county, and city codes. The general norm is to follow the municipal regulations that are most stringent.
Before digging trenches for the foundation of your pergola, you must inspect the site and secure a permit. By doing this, you’ll be able to prevent running into any underground gas pipes, sprinkler lines, or electrical wiring. Find a local service provider to help you if you’re unsure about this step.
2. Setting Up The Foundation
A jackhammer can be rented or purchased if you need to break through hard ground. Align your columns after the holes have been dug and straighten them. (Laser levels or string lines are options)
Remember to completely fill out the forms before securing them in place. Sonotubes and two-by-fours can be used to construct your forms. After that, you can secure them to the ground with common steel-concrete forming stakes.
Rent a concrete mixer or buy a spade and wheelbarrow to mix the concrete. Once your forms are in place, pour the concrete and allow it to dry for a day.
The pouring should ideally be completed in a single day. Concrete must be added in modest increments at a time.
3. Wood And Structure Preparation
Choose your preferred wood and the number of wooden posts, beams, and rafters needed for your construction.
According to how many solar panels you plan to add, you’ll decide how many rafters to use and how far apart to space them (along with their weight and dimensions) To ensure that your columns are the proper length, make sure to measure the height of each one.
You should sand and stain the wood to remove any flaws before assembling it into a structure. While staining is necessary for cosmetic reasons, it also acts as a protective coating to make your wood resistant to damaging outside elements. The wood stain should be applied in two to three coats.
The procedure of staining wood takes a lot of time. The drying time between layers can exceed 24 hours. You might find this frustrating, but you cannot skip this procedure. For the longevity of your pergola, it is essential.
4. Roofing
On your roof, start by removing the shingles and making holes. Carefully execute this to prevent any leaks. Risers, screws, and flashing from the riser manufacturer are required to erect the roof structure. A means to cut through the roof’s layers will also be necessary.
Determine your home’s top plate. Once you’ve determined that each house will vary, the following step is to open the roof’s holes.
Additionally, there are several roof types. You need to dig a hole large enough, often square, for the base of the post after you know where your top plate is positioned.
Use a reciprocating or circular saw to create the hole. After digging the hole, you can place the post above the top plate and cover it. The flashing must be installed once the hole has been covered. What will make everything waterproof is the flashing.
Once the riser and flashing are complete, you may install the U itself, which will support the entire beam. Finally, insert the beam. The beam can then be secured to the U using a few screws.
5. Assembling The Structure
Your wooden construction can be put together once the concrete footing with supports is ready and the wood has been treated and sanded. Use your ground posts as a starting point for this. When screwing and attaching anything, ensure you have enough clamps to brace everything.
Position your columns and posts, ascent your upper braces, and set the upper beam in place. The following screws and nuts can be used to secure everything: Simpson robust tie nut washers and structural wood screws.
Repeat the procedure for the second beam after you’ve secured the first one, then present them both and fasten them to the roof risers. Time for the rafters now that both beams are securely fastened.
The rafters’ woodwork can either be completed entirely on-site or off-site. If you are working on-site, you will want a Japanese handsaw, a circular saw, a sander, and some chisels.
The rafters can be sanded and stained after the cuts have been done. Then, using timber lock 10-inch long screws, secure them from the top by measuring the location of their final resting place.
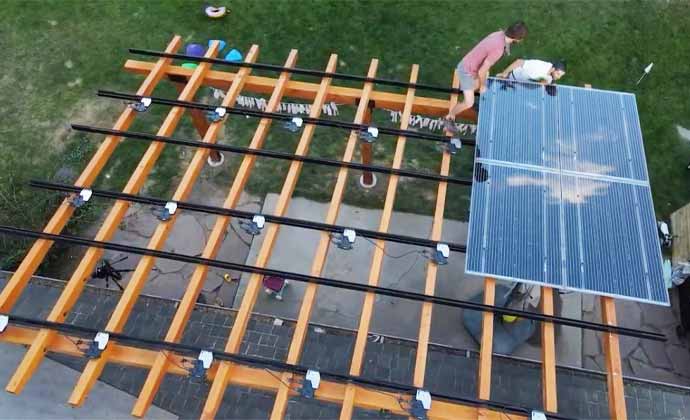
6. Solar Panel Installation
The placement of the rails or racking is the first step in the multi-step process which is panel installation. The panels will be placed here, along with the microinverters and cables that will be hidden there. Before you start placing solar panels you should take into acccount various solar panel issues and proceed accordingly.
Process:
- Place the rails or racking; the panel maker will give you instructions on rack assembly alignment and spacing.
- Install the cables (trunk cable).
- With bare copper, the pergola is grounded.
- Put the microinverters in place. One is needed for each panel.
- Bring every panel up to your building and attach it to a microinverter one by one.
Conclusion
A solar patio cover can be constructed from any pergola or outdoor roof. As long as the structure can support the additional weight of solar panels, all required to convert a regular pergola into a solar pergola is enough square footage to place a solar array.
This is an excellent way of improving the aesthetics of your house and your outdoors while spending not much. It also allows you to generate electricity in an eco-friendly way.
I hope this article has touched upon everything related to the installation of a solar patio/pergola and that it has helped you.